
Hey there! If you're like me, you've probably got a metal storage rack at home or in the office that could use a little extra space. Maybe you've outgrown the current number of shelves, or you just want to organize your stuff more efficiently. Well, you're in luck because today I'm going to walk you through how to add additional shelves to a metal storage rack. And as a metal storage rack supplier, I've got some tips and tricks up my sleeve that'll make this process a breeze.
Why Add Additional Shelves?
First things first, let's talk about why you might want to add more shelves to your metal storage rack. There are tons of reasons, really. Maybe you've acquired more stuff over time and need more space to store it all. Or perhaps you're trying to be more organized and want to create specific sections for different items. Adding shelves can also make it easier to access your things, as you can spread them out more evenly.


What You'll Need
Before you get started, you'll need to gather a few tools and materials. Here's a list of what you'll need:
- Measuring tape: You'll need this to measure the dimensions of your existing rack and the new shelves you want to add.
- Drill: A drill will be necessary to make holes in the rack for the new shelves.
- Screwdriver: You'll use a screwdriver to attach the new shelves to the rack.
- New shelves: You can purchase pre-made shelves from a hardware store or online, or you can make your own if you're feeling crafty.
- Screws and bolts: These will be used to secure the new shelves to the rack. Make sure you choose the right size and type for your rack.
Step 1: Measure Your Rack
The first step is to measure your existing rack. You'll need to measure the width, height, and depth of the rack, as well as the distance between the existing shelves. This will help you determine the size and number of new shelves you'll need to add.
Step 2: Choose Your Shelves
Once you've measured your rack, it's time to choose the new shelves. You can choose from a variety of materials, including wood, metal, and plastic. Metal shelves are a popular choice because they're durable and can hold a lot of weight. You can also choose from different sizes and styles to fit your needs.
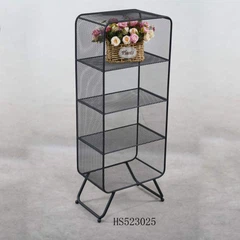
If you're looking for a specific type of metal storage rack, check out our 2 Tier Metal Rack, 4 Tier Metal Rack, or Large Metal Storage Shelves. These racks are made from high-quality metal and are designed to provide maximum storage space.
Step 3: Prepare the Shelves
Before you attach the new shelves to the rack, you'll need to prepare them. If you're using pre-made shelves, make sure they're the right size and that they're in good condition. If you're making your own shelves, you'll need to cut them to the right size and sand the edges to make them smooth.
Step 4: Mark the Holes
Once you've prepared the shelves, it's time to mark the holes for the screws and bolts. Use a measuring tape to measure the distance between the existing shelves and mark the spots where you'll need to drill the holes. Make sure the holes are evenly spaced and that they're the right size for the screws and bolts you're using.
Step 5: Drill the Holes
Now it's time to drill the holes. Use a drill to make the holes in the rack and the shelves. Make sure you drill the holes straight and that they're the right depth. You may need to use a drill bit that's slightly smaller than the screws and bolts you're using to ensure a tight fit.
Step 6: Attach the Shelves
Once you've drilled the holes, it's time to attach the shelves to the rack. Use a screwdriver to insert the screws and bolts into the holes and tighten them securely. Make sure the shelves are level and that they're attached firmly to the rack.
Step 7: Test the Shelves
Once you've attached the shelves, it's time to test them. Place some items on the shelves and make sure they're stable and that they can hold the weight. If the shelves seem wobbly or unstable, you may need to tighten the screws and bolts or add some additional support.
Tips and Tricks
- Use a level: Make sure the shelves are level before you attach them to the rack. This will help ensure that they're stable and that they'll hold the weight evenly.
- Choose the right size and type of screws and bolts: Make sure you choose the right size and type of screws and bolts for your rack and shelves. Using the wrong size or type can cause the shelves to be unstable or to come loose over time.
- Add additional support: If you're adding heavy items to the shelves, you may need to add some additional support. You can do this by adding brackets or braces to the shelves or by using a stronger type of shelf material.
- Be careful when drilling: When drilling the holes, make sure you're careful not to drill through the rack or the shelves. This can cause damage and make the shelves unstable.
Conclusion
Adding additional shelves to a metal storage rack is a great way to increase your storage space and organize your stuff more efficiently. With a few tools and materials, you can easily add new shelves to your existing rack and create a customized storage solution that meets your needs.
If you're interested in purchasing a metal storage rack or need more information about adding shelves to your existing rack, please don't hesitate to contact us. We're a metal storage rack supplier and we're here to help you find the right solution for your needs.
References
- Home Depot. (n.d.). How to Add Shelves to a Metal Storage Rack. Retrieved from https://www.homedepot.com/c/ah/how-to-add-shelves-to-a-metal-storage-rack/9ba683603be9fa5395fab90843d86d4
- Lowe's. (n.d.). How to Build a Shelf for a Metal Storage Rack. Retrieved from https://www.lowes.com/n/how-to/build-a-shelf-for-a-metal-storage-rack
- Amazon. (n.d.). Metal Storage Racks. Retrieved from https://www.amazon.com/s?k=metal+storage+racks